
This the second annual reminder that we are NOT doing thanksgiving, and Christmas is on it's way out too. We are tired of them, they are not fun and thanksgiving has nothing to do with thanksgiving anymore, it's all about imposing on people and stuffing your face with food that is beyond boring. Christmas is purely commercial and I never much cared for the "religious" parts of it anyways, since Jesus was NOT born in or even near December.
Both are humbugs.
INB4 "you're a scrooge" STFU!
11/19/2012
9/18/2012
Zenith M730 Part II
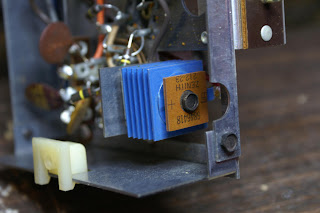
Well it's done. I got all the caps replaced. I was not able to re-stuff the old multi section cap and ended up putting the new caps under the chassis. Here is a pic with all the new caps. The orange pillow shaped ones and the large striped cans. I forgot to take a picture of the replacement for the selenium rectifier, but you can see most of it in the lower right corner. I installed 2 33ohm 10 amp resistors (in series) in front of the 1n4007 diode to lowr it's voltage output to 130vdc about 5 volts lower than it should be but that is within tolerance.

The only issue with the radio after I finished recapping is that I accidentally hooked the AM loop antenna to the FM antenna connector and Vice-Versa. once that was corrected it works just fine, no re-alignment needed.
Cleaned and lubed all pots and bearings.
Cleaned the FM/AFC/AM switch.
Cleaned most of the Cadmium Sulphide off the chassis.
Cleaned the dust and spider webs out of the case.
Implemented the following safeties:
recapped (of course).
replaced selenium rectifier with a silicon diode.
larger surge resistors
polarized plug
rear interlock keyed for the polarized plug.
1 tube tested bad on my tester but I am debating whether to replace it at this time.
9/09/2012
Zenith M730
So I accidentally bought a radio on ebay. I was looking for a radio that we had when I was a kid and thought that this one was it (as best I could remember).
 Turns out it was not, the radio we had was one of these:
 Anyways... there was an option to "make offer" I never did that before on ebay and figured it would either not accept it or would take a day. So I offered $15, it instantly came back and said offer accepted pay now! Whoa, wait a minute! Then I looked at the shipping and that would be about $30 THIRTY DOLLARS! Sigh.
Well I got it the other day and hooked it up to my dim bulb tester:
 And the bulb did not light (which is good). The radio worked (both AM and FM) even though the auction said the FM did not (bonus). The case is in really good condition and may only need some polishing. The knobs are worn but not enough to replace them.
So now I am in the process of electrically refurbishing it. Here the list of things that need to be done:
Replace all the paper capacitors (3).
Replace any weak tubes.
Replace the potted electrolytic 3 section capacitor (or re-stuff it).
Replace the Selenium Rectifier with a silicon Rectifier (and attending passives).
Fix the radio so that it cannot be plugged in (easily) with a hot chassis when the radio is off.
Add a fuse.
And anything else I can think of that will keep the radio from accidentally killing someone.
When I opened the radio it was only slightly dusty inside, especially for a radio that is around 60 years old. As far as I could tell it was all original, or if any repairs were done, they had been done with factory parts. The one scary thing I noted was that some of the metal parts were covered with a yellow dust. I did not know what this was and this made me a bit leary of it. I avoided touching it and cleaned it with denatured alcohol after blowing the chassis off outside. Later on I googled "yellow powder vintage radio" and found out that it is cadmium sulphide. YIKES! seems some of the parts are cadmium plated. So I cleaned it some more with vinegar (neutralizes the CS and removes it) and denatured alcohol until most of it was gone. Then wiped down my bench and thoroughly washed my hands.
here are some pics:


So why am I refurbishing a "working radio"? Because it's a death trap. I am going to make it a slightly less "deathy" death trap. because I have never done it before, and because I can.
What I have done already:
added quick disconnects for the AM antenna and the FM antenna lugs, so you don't have to un-solder them to open the back of the radio.
Opened the 3 section capacitor (smelled like band-aids), cleaned it out and prepped it to possibly receive the modern caps I ordered (if they will fit), otherwise they are going under the chassis.
picked up the 1n4007 diode.
Stay tuned.


Well I got it the other day and hooked it up to my dim bulb tester:

So now I am in the process of electrically refurbishing it. Here the list of things that need to be done:
Replace all the paper capacitors (3).
Replace any weak tubes.
Replace the potted electrolytic 3 section capacitor (or re-stuff it).
Replace the Selenium Rectifier with a silicon Rectifier (and attending passives).
Fix the radio so that it cannot be plugged in (easily) with a hot chassis when the radio is off.
Add a fuse.
And anything else I can think of that will keep the radio from accidentally killing someone.
When I opened the radio it was only slightly dusty inside, especially for a radio that is around 60 years old. As far as I could tell it was all original, or if any repairs were done, they had been done with factory parts. The one scary thing I noted was that some of the metal parts were covered with a yellow dust. I did not know what this was and this made me a bit leary of it. I avoided touching it and cleaned it with denatured alcohol after blowing the chassis off outside. Later on I googled "yellow powder vintage radio" and found out that it is cadmium sulphide. YIKES! seems some of the parts are cadmium plated. So I cleaned it some more with vinegar (neutralizes the CS and removes it) and denatured alcohol until most of it was gone. Then wiped down my bench and thoroughly washed my hands.
here are some pics:

The selenium "Kill you in your sleep" rectifier.

One of the paper "burst in to flames" capacitors.

The front of the chassis with some of the Cadmium "give you cancer" sulphide.

The underside of the "one slip and you're electrocuted" chassis.
So why am I refurbishing a "working radio"? Because it's a death trap. I am going to make it a slightly less "deathy" death trap. because I have never done it before, and because I can.
What I have done already:
added quick disconnects for the AM antenna and the FM antenna lugs, so you don't have to un-solder them to open the back of the radio.
Opened the 3 section capacitor (smelled like band-aids), cleaned it out and prepped it to possibly receive the modern caps I ordered (if they will fit), otherwise they are going under the chassis.
picked up the 1n4007 diode.
Stay tuned.
9/08/2012
Sansui Model 7070 Thrift Store Find
A couple of weeks ago I was at a thrift store and ran across an old radio shack scanner. I attempted to see if it worked and using an ac adapter I found at the trift store I went to the testing table to plug it in. There was some old guy just standing looking at something on one of the shelves. I said excuse me and plugged the scanner in. It did not work. Then I noticed another scanner exactly like the first (even down to the missing battery cover). I tried that one and it did not work either. Then I noticed this:
 It was on the shelf below and I went to pick it up. The old guy taps me on the shoulder and says "I'm checking that out". "I'm sorry, what?" says I. "I'm checking out that stereo" says he. "Oh, I did not know" says I. Not knowing what it was I wandered around and kept a close eye on it as it was very heavy and looked like it was from the 70's. Heavy is good when it comes to stereo's, and this one weighs about 40 pounds. Anyways... he worked on it for another 5 or 10 minutes then walked off, having not got it to utter a sound. I immediately walked over and hooked up a random speaker I found near by and fiddled with the knobs until I moved the one that was for the speakers from "off" to A and BLAM! sound. I turned it off again and took it straight up to the cashier. I got it for a VERY good price.
I took it home and hooked it up to a pair of speakers and it worked just fine, except that 5 lights did not work. when I opened it up to blow the dust out and check for bad capacitors and any scorch marks I tapped the lights and 2 of them started working again. leaving the middle dial light, the needle light, and the right light in the right channel power meter. I looked it up and found that it is a relatively high end stereo for the time it was made. There was one on ebay in cosmetically better shape and with all the lights working that was going for more than $200. So I cleaned it up a bit video taped it working. It sold yesterday for a lot more than I paid for it.
The one problem is that it sounded so nice I regret selling it. Oh well, hopefully the guy who bought it will enjoy it more than I would have.
8/28/2012
2001 A Sneaky Cat
In the foreground is Candy, The other cat is Jack a.k.a Jack "The Tripper". Candy is vary skittish, She stays in our back room. We are trying to get them to tolerate each other. So every day or so I let them get together, while I watch to make sure they don't beat the crap out of each other. This is generally how the encounters go down.
Also everything is better with dramatic music.
Also everything is better with dramatic music.
8/23/2012
Curiosity Heat Shield Descent Stabilized.
Man what a pain that was, getting the frame rate right and tracking the heat shield as it got smaller and smaller. I lost it a couple of times and had to redo it 3. I could not track it at the last few seconds before impact and added the JPL enhanced closeup video at the approximate time it impacted.
Forgot to mention I did each frame by hand.
Forgot to mention I did each frame by hand.
8/15/2012
Building an 18 Volt Power supply for Cordless tools
Several years ago my brother acquired a cordless band saw/pipe cutter. The batteries died and although I do not use it very often it would be nice to have it in working condition. A replacement battery is $61, rebuilding the batteries would cost $39. The alternative is to build a power supply. I did some research online and with the help of people on the badcaps.net forum I built one.
The parts list is as follows:
1 - transformer 120v in 16v out, I do not have the amp ratings for it.
1 - 25 amp Bridge rectifier
1 - 10,000uf 35v or higher electrolytic capacitor.
You can use 3 - 3300uf 35v caps in parallel or 2 - 4700uf to 5000uf 35v caps in parallel.
1 - 10amp 3 prong power cord
1 - 20 amp fuse
1 - toggle switch
5 amp fuse or circuit breaker for 115V line voltage
1 - LED
1 - 270-500 ohm 2 watt bleeder resistor
misc wire that can handle 20amps.
The transformer was pulled from an APC 400 BackUPS (you can find them sometimes at Goodwill), Its input was 120v, and there were 3 wires for output, yellow, white, and purple. Voltage from yellow to purple and white to purple was about 8 volts. Voltage from white to yellow was 16 volts (just what I needed). The first rectifier I used was pulled from an electric wheel chair charger, but I changed it to one I purchased that had the flat quick connectors. Other sources for the rectifier are computer power supplies, you can get the flat inline ones that range from 4 to 8 amps depending on the PS. The capacitor I had to buy, since I needed the voltage rating to be greater than 25v. All the ones I had were 16v. You can use a capacitor with a higher voltage rating but not lower. Since we are dealing with 22 volts a 25v cap is just a little to close, so a 35v is better. The one I used is 50v. Wiring is done per this schematic:

 I mounted everything temporarily to a board. With the band saw not running, voltage from the output is 22vdc, while it is running the voltage reads 18vdc. I will mount the power supply in a box and add a switch, light, and fuses. At this time I am not sure what the maximum amperage draw is, I will have to check that and install the appropriate fuses. I did not install the bleeder resistor at this time, and I'm not really sure if one is needed. It would be installed across the leads on the capacitor if I do. The capacitor and rectifier cost $20, I could have gotten them cheaper if I ordered them on line, but did not want to wait for them.
The rectifier is mounted to a piece of aluminum (with heat sink compound) that I had to install to properly brace the front and rear panels, since the original circuit board was used for that.

 I may mount a fan in it at a later time if I find there are any heat
issues. I doubt there will be as I will not be using it for continuous
duty.
I may mount a fan in it at a later time if I find there are any heat
issues. I doubt there will be as I will not be using it for continuous
duty.

The parts list is as follows:
1 - transformer 120v in 16v out, I do not have the amp ratings for it.
1 - 25 amp Bridge rectifier
1 - 10,000uf 35v or higher electrolytic capacitor.
You can use 3 - 3300uf 35v caps in parallel or 2 - 4700uf to 5000uf 35v caps in parallel.
1 - 10amp 3 prong power cord
1 - 20 amp fuse
1 - toggle switch
5 amp fuse or circuit breaker for 115V line voltage
1 - LED
1 - 270-500 ohm 2 watt bleeder resistor
misc wire that can handle 20amps.
The transformer was pulled from an APC 400 BackUPS (you can find them sometimes at Goodwill), Its input was 120v, and there were 3 wires for output, yellow, white, and purple. Voltage from yellow to purple and white to purple was about 8 volts. Voltage from white to yellow was 16 volts (just what I needed). The first rectifier I used was pulled from an electric wheel chair charger, but I changed it to one I purchased that had the flat quick connectors. Other sources for the rectifier are computer power supplies, you can get the flat inline ones that range from 4 to 8 amps depending on the PS. The capacitor I had to buy, since I needed the voltage rating to be greater than 25v. All the ones I had were 16v. You can use a capacitor with a higher voltage rating but not lower. Since we are dealing with 22 volts a 25v cap is just a little to close, so a 35v is better. The one I used is 50v. Wiring is done per this schematic:

I wired a standard 10 amp power cord to the input of the transformer and plugged the yellow and white wires directly in to the rectifier. I ran 2 wires from the dc output to the capacitor (making sure to keep the polarity correct). From the capacitor I ran the wire through another 10 amp cord to the contacts inside the battery cartridge (after removing the dead batteries). This way If needed I can still use batteries if I want to.
The results look like this:

I could not find a box
to mount it in, so I re-used the UPS case. I was able to re-use the
original circuit breaker, and switch. I also added a 20 amp fuse on the
DC side, and an LED on the front of the case.
The rectifier is mounted to a piece of aluminum (with heat sink compound) that I had to install to properly brace the front and rear panels, since the original circuit board was used for that.

The LED is connected to a 270 ohm 5 watt resistor. It bleeds the
capacitor down to a safe voltage in about 25 seconds when power is
turned off. The LED will stay dimly lit for some time after that.
Pressing the switch on the band saw will make the LED go out if power is
off. The LED does NOT dim when the band saw is in use.


8/08/2012
Converting a 9.6 volt Makita Drill from Nicad to LIPO
I have had an old 9.6 volt Makita drill since around 1989 or 1990. I bought it when I was an A&P. Since then I have replaced the batteries about 4 times. I recently bought an 18v Lithium ion Makita. I wanted to continue to use the old Makita but did not want to buy any more batteries as they are kind of pricey and do not last long. I have seen several videos on the internet on connecting RC LIPO batteries to the Makita and they work fine.... EXCEPT that none of the people who do this take any precautions to prevent over discharging the LIPO batteries. LIPO cells do not like to be discharged below 2.7 volts per cell. If you do that you kill them. The good thing about them is that they are relatively cheap. You can pick them up for $15 to $20 for an 1800mah or 2200mah battery respectively. this is 200 to 500 mah more than the replacement batteries from Makita which are 1300mah to 2000mah.
My choices for not over discharging them were to make a circuit the cut off the voltage at around 9 volts or set off an alarm when they got down to 9 volts. I went with the latter as it was easier to build and some of the parts can be scrounged from an old computer power supply. The parts list is as follows:
1 - Makita drill
1 - 4.7k resistor
1 - 47k resistor
1 - 1k resistor
1 - 18k resistor
1 - LED any color
1 - LM393 (pulled from the old Power supply)
1 - TL431 (or a KA431 pulled from the old PS, I got 3)
1 - Piezo buzzer (not a speaker a BUZZER it will have all the buzzer circuitry built-in)
1 set of Deans connectors (male for the drill and female for the battery)
at least 1 - 3 cell LIPO battery around 1800 to 2200 mah (any bigger will not fit). Do not use any more or less celled batteries as this circuit will not work right for them.
Optional:
1 - Piezo buzzer (not a speaker a BUZZER it will have all the buzzer circuitry built-in)
1 - variable voltage dc power supply or a 9 volt battery that has been discharge to 9v or less, and 1 good 9v battery.
This Schematic:

I started by building the circuit on a breadboard. I used the variable DC PS to make sure it worked. then put the circuit together by just soldering the components to each other. It's ugly but it works.
 Next I encased the circuit in epoxy so that it can take abuse.
 After each step I made sure it still worked.Then I mounted everything in the Makita.
 I drilled a hole in the top center for the LED carefully routed the wires around the motor adding extra heat shrink or hot glue in places where the motor might rub its connectors on the new wiring (nothing really prevents the motor from turning slightly and it would eventually cut through the wires. The piezo buzzer fits but does not work as it is pinched too tightly when the case is closed (it worked outside the case). I will have to find a smaller one. The pizeo buzzer is attached to the positive side of the LED and to pin 1 of the LM393. The one I have handles something like 3 to 18 volts so the 7+ volts there works fine. I had some trouble getting the case closed again as the gears and such moved, but I did get it closed. So now when the drill runs the battery down to around 9.1 volts the LED starts to light up and gets brightest when it is almost exactly 9v. The buzzer will sound too. I added the buzzer since, if the drill were left unattended the under current circuit would slowly run the battery down and I wanted an audible warning to remind me to unplug the battery. As an added bonus when the drill is started the LED flashes once, this is nice as it lets you know the circuit works. It works fine as you can see in the video.
If your a wuss you could just order one of these and plug it in to the charging port of the battery. WUSS!
My choices for not over discharging them were to make a circuit the cut off the voltage at around 9 volts or set off an alarm when they got down to 9 volts. I went with the latter as it was easier to build and some of the parts can be scrounged from an old computer power supply. The parts list is as follows:
1 - Makita drill
1 - 4.7k resistor
1 - 47k resistor
1 - 1k resistor
1 - 18k resistor
1 - LED any color
1 - LM393 (pulled from the old Power supply)
1 - TL431 (or a KA431 pulled from the old PS, I got 3)
1 - Piezo buzzer (not a speaker a BUZZER it will have all the buzzer circuitry built-in)
1 set of Deans connectors (male for the drill and female for the battery)
at least 1 - 3 cell LIPO battery around 1800 to 2200 mah (any bigger will not fit). Do not use any more or less celled batteries as this circuit will not work right for them.
Optional:
1 - Piezo buzzer (not a speaker a BUZZER it will have all the buzzer circuitry built-in)
1 - variable voltage dc power supply or a 9 volt battery that has been discharge to 9v or less, and 1 good 9v battery.
This Schematic:
I started by building the circuit on a breadboard. I used the variable DC PS to make sure it worked. then put the circuit together by just soldering the components to each other. It's ugly but it works.


If your a wuss you could just order one of these and plug it in to the charging port of the battery. WUSS!
7/16/2012


7/01/2012
Meet Jack

We did not care for the name Petri or Julius and while trying to think of a name for him we noticed that we could barely walk when he was around as he kept rubbing on our legs and getting in the way, Thus he got his name Jack... Jack the Tripper!
He is probably the coolest cat we have ever owned. He loves to climb on our shoulders and backs.


5/07/2012
Amber Wrench Light on a Sonicwall TZ-180
I have had several older Sonicwall TZ-180's were the wrench or amber error light comes on/blinks or the Sonicwall suddenly has strange errors. Since these were out of warranty I figured I would open them up. Here is what I found.
 As you can see the 2 - 470uf 16v capacitors are swollen. I replaced them with 2 - 470uf 25v capacitors I got from www.badcaps.net. The voltage does not matter as long as it is the same or higher than the old ones. Do not use Capacitors from Radio Shack.

The capacitors cost .67 ea. The repair took 15 minutes. You will need a decent soldering station and a lighted magnifying glass to do the job. See cap removal page on badcaps site on how to replace them. Replace both caps even if one is not swollen. The third green and copper cap can stay if it is not swollen.
I recommend doing a boot to firmware with factory defaults from the settings section. This will clear the memory of any corruption due to the bad caps. You may have to do a boot to safe mode the first time if the Sonicwall was not accessible before the repair. Unplug power hold the reset button down plug in power and continue to hold the button for 30 seconds (no less). Then manually configure your IP to 192.168.168.xxx where xxx is any number except 168. You can then access the Sonicwall on 192.168.168.168. Then do the factory reset.
5/05/2012
J.C. Joins Penny

We had to put J.C. down today. She was 19 and suffering from kidney failure. She will be missed.


In 1996 2 months after Kathi's cat Midnight was put down due to kidney failure, we went to the Arizona Humane society to get another cat. J.C. was a 2 or 3 year old cat at the time and was list as not able to get along with other cats. We named her J.C. which stands for "Just Cat". We almost called her Loki as she was always getting in to trouble. She especially like climbing on things.

We adopted her and shortly afterwards received Penny. Since they were both fighting and tearing up the furniture we had them declawed. If you don't like that we declawed them, keep it to yourself I do not care about your opinion.

We declawed them at the same time and when they came home they got along pretty good. There was the occasional fight but it was like two old ladies with oven mits slapping each other.
When we got her, J.C. liked to suck on your shirt, which we had to stop as it would leave stains. Kathi was afraid to let J.C. go outside, so on the first occasion she did she tied a 100' length of rope to her collar.
Here is a "cat scan" I did of her.

One thing J.C. did that I never got video of, was whenever Kathi would sing J.C thought she was in pain and would come running and respond to Kathi between verses.
2 years ago she started losing weight, her teeth started falling out and she would only eat soft cat food soup. About 6 months ago she was down to 5 pounds and started peeing blood. We had to keep her in the back room and cover everything in plastic as she would pee anywhere. We did not want her to suffer anymore and finally put her down.

4/25/2012
Subscribe to:
Posts (Atom)