2/10/2014

Silvertone 7407 Refurbish

Picked up this Silvertone from an Antique store for $20 not working. The receiver chassis number is 528.54746 and the Amplifier is 528.69240 There is a number stamped on the amp chassis 30-125-2 or it might be 30-125-2a.
 It was plugged in and probably in use at one time at the antique store.

All it is, is a Silvertone Console Tuner, and amp Chassis inside a table top cabinet.
It appears to be all original inside.

It was in need of a recap.

This is the Schematic of my amp as found.

It has dual station dials, and indicator lights for being on station (in Mono),
 And in Stereo.

I had to replace:
1 - 6be6
1 - em84 with a NOS one from ebay.
2 - 6bq5
The resistor on the em84 eyetube.
all the electrolytics
several resistors on the right channel of the amp (the left all measured good).
There was 1 burned and split resistor in the tuner, and one singed resistor in the power supply.
I blew up a 100uf e-cap in the voltage doubler and had to replace that with a much higher voltage rated one. Seems that the amp originally had a 200vdc cap in the voltage doubler circuit. Why mine blew I do not know. The replacement 450vdc cap works fine. It has a Phono and Tape in. I have a CD player or mp3 player on the Tape In.
For $20+$45 in parts to fix, you can't get much better than that. It sounds really good through my Fisher XP-9C Speakers.

1/20/2014

Recent Acquisitions

Eico 369 Sweep Generator


 Did a full recap and calibration

Lloyd's TM-838n 2 speaker radio.


 I installed an isolation transformer and a fuse.

Lambda LP-532-FM Calibrated DC power supply


12/28/2013

Archer StereoDyne/3 Amplifier Clone

I was interested in building a small single ended amplifier, and found several that had been sold in the 60's. They went for quite a bit on ebay and I figured I would build one.

The amp in question was sold under several names and may have all used the same or similar design. The amps were sold under these names:
Archer StereoDyne/3
Truetest stereo/8
Monarch SA-10

I found this in an online copy of a Radio Shack Catalog.
I had found a stainless steel drawer at Goodwill. I had to order a couple of Edcor XSE15-8-2.5K audio output transformers, which took 6 weeks to ship. I had most of the other parts and only had to order some POT's and 3 meg resistors.

I designed the Layout of the amp in Autocad 2002. I then printed the drawings at 1:1 and taped them to the drawer.

 Center punched and drilled the holes.

Attached all the hardware, switches and pots.


 Then soldered in all the components.
There was some problems with hum and it took a couple of days to troubleshoot with help from an Antique Radio Forum.This is the original Schematic.
Here is the Final Schematic.
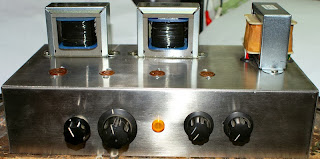
These are the pics of the finished amp. It still needs labels and better knobs.

Changes from the original design:
Added Isolation power Transformer to prevent accidental electrocution.
Better Audio output transformers.
Power indicator light.
3 prong plug grounded to chassis.
2 Channel input.
Fuses on input and output side of power transformer.
Used shielded cable for all the input wiring up to the 12ax7.
Added a 100uf Capacitor after first filter to reduce ripple by half.
Added a 22uf capacitor off of 125v source to pin 1 of both 35c5's to cancel out hum.
Removed "tone control".
Removed Stereo/Mono switch.

Hum is now down to 20 millivolts and can only be heard with your ears about 6 inches from the speakers.

This is a 1.5 watt per channel max, single ended tube amplifier. It will drive most any speakers just fine, frequency response is approximately 70 to 17000hz Not Hi-Fi, but 99% of the population can't tell. It will not do much in the way of deep bass, but bass is over-rated anyways.

12/26/2013

No Fuss "Lasagna"

Prep time 30 minutes.
Bake time 30 to 45 minutes or until cheese on top starts to brown.


Ingredients
1 - pound Italian sausage
1 - onion chapped
2 - cloves garlic chopped
1 - 12 oz bag egg noodles
2 - small cans mushrooms (or 2 cups fresh sliced)
16oz - Ricotta
2 - eggs
Italian Seasoning
Salt
Pepper
2 tablespoons butter (not margarine YA PANZY!)
2 - 32 ounce jars spaghetti sauce (your choice)
1 pound mozzarella cheese grated.

Heat Oven to 350 degrees.


To cut recipe in half , use half the noodles, and 1 jar spaghetti sauce.

Boil noodles 4 minutes (you read that right).

Don't worry about exact measurements or amounts, feel free to skimp on ingredients that you think are bad for you (or you don't like), but don't blame me if it doesn't turn out good (WUSS!).

Cook chopped onions in butter with 1 tsp salt, and 1 tsp pepper until slightly translucent. Brown Italian Sausage with 1 tsp Italian Seasoning, 1 clove garlic, add mushrooms towards the end.

While browning sausage, add 1 chopped clove garlic, 2 eggs, and 1 tsp Italian seasoning to Ricotta cheese. Whisk together.

Drain noodles, add (everything) both jars spaghetti sauce, sausage, onions, mushrooms, and ricotta cheese mixture to large pot and mix together carefully.

Dump in to one large lasagna pan or 2 or 3 9x13 inch pans. Top with grated mozzarella, and bake as noted above.

Remove from oven and let cool 15 minutes.

12/11/2013

Knight Signal Tracer

Picked this up at hamfest Saturday for $15. it does not have the probe and I will be making one.

Before


I did a simple recap on it, which reduced the noise levels on the (non noise setting). I replaced the cord, mic connector, and added a fuse. I removed the nasty stained speaker grill and replaced it with some black speaker cloth and a box fan guard. I then gave it a lite bath.

The 6E5 Eye tube seems a little dim and I will look for a replacement at some point.

After

11/24/2013

General Electric Super Radio I

Never much cared for AM/FM only Transistor Radios, especially boring GE's. I had read many time on several forums about the GE Super radios. Today I found one at Goodwill. A Model 7-2880B Which is one of the first models. Many people claim it is very sensitive and a good performer, but I am often skeptical. My test of any of these claims is how well they can receive KAZG. KAZG is a Daytime only station that drops to 50 watts at night. I plugged this radio in, at the store which was about 12 miles from KAZG and it was after sunset. Normally any radio I try, will pick up either nothing or just barely get a signal. This radio has promise because it was staticy but listenable. The final test is when I get home. My house is about 4 or 5 miles from the transmitter. After sunset the station is very staticy with most radios. With this Radio the station sounds almost as loud and clear as most other radios do in the daytime (for the same station). It even beats my Zenith Royal 780 The top contender of the portable radios I own.
 The large speaker and tone controls are a plus as well.

I tested it one night and I was able to pick up KNX 1070 LA 372 miles from me, and KKOB 770 in Albuquerque, NM 338 miles from me.

11/17/2013

Refreshing The Fisher XP-9C Speakers Part III

Finally got a chance to work on these speakers again. I made a new frame for the speaker fabric. I was able to re-use the old fabric as it had not shrunk too much.
The picture below shows the frame under the covering because of the camera flash but it is not visible otherwise.
There is one final issue. one of the speakers has a problem with the "Fried egg" tweeters, they do not work unless pressure is applied to a specific point on their rims. I have them temporarily working with a pair of magnets. I will have to replace all of them at some point.

How do they sound? Great but, Very BASSY. Treble needs to be bumped a bit to compensate. I tested them with different records and CD's. They really like orchestral music. But sound good with Rock. They did not work well with my Beat Dominator CD. The bass was just a little too low for the crossovers. If I kept the volume at a reasonable level they could handle it, but turn it up too much and they cut out.

11/13/2013

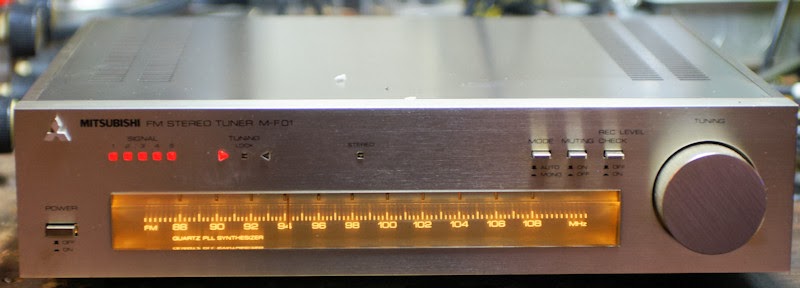
Replacing the Dial lights in a Mitsubishi M-F01 Tuner

I am writing this up in case anyone else is dumb enough to try it, and you want to know basically how to do it right.

The Mitsubishi M-F01 FM Tuner I got the other day had some burnt out bulbs, turned out 1 white bulb, and both green bulbs were out.

I made the HUGE mistake of removing all the screws on the faceplate to get to the bulbs.

HOWEVER! I did manage to get the bulbs replaced. I found that the old incandescent bulbs ran off of 9vdc and that they were all white bulbs with colored rubber covers, one bluish, and the other Green. The white light comes from the blue colored one and the green you can figure out yourself.

It is not necessary to remove the dial knob to remove the faceplate, it is not necessary to remove the faceplate (but I did) :oops:

When you remove the faceplate, the dial, and tuning knob fall out. Then the dial string unravels YAY! :shock:

In reality the only thing you have to do is remove the 2 screws that hold the circuit board in the picture below circled in red. Then carefully move the circuit board out of the way.

ANYWAYS... I don't have the bulbs and did not want to go on a quest to find some, plus I am impatient. But I did have these:
http://www.modeltrainsoftware.com/ledlights1.html

The LED's work on a wide range of voltages and it does not matter what polarity or if you have AC or DC. Being standard LED's they were also the same size as the old bulbs. The old bulbs were mounted on small circuit boards, three wires; blue, green, and Black. Blue for the white light, green for green light and black was ground.

I removed the little circuit boards and I connected 1 wire from the white LED to the Blue wire, one wire of the Red LED (I chose Red instead of Green) to the green wire, and then the remaining wires from both to the black. I used shrink tube as needed. I installed the bulbs in the dial with hot glue after verifying that they worked. I did this for both sides (there are 2 sets of lights).

I got it back together and restrung the dial.

Not on station!

On Station!
 

The only disadvantage to these LED's is that if you connect them to AC or unfiltered DC they may flicker juuuuuuuust on the edge of your perception.

I did not take any other pictures because I was too irritated and did not think I was going to get it back together.

10/29/2013

Refreshing The Fisher XP-9C Speakers Part II

After I received the non polarized electrolytics I replaced them on the crossover. I had to order extra 50uf capacitors as Parts Express did not carry 25uf caps. I put 2 - 50uf caps in series to get 25uf.
To make a good seal around the speakers I picked up some weather stripping. I wanted a good seal since this is an acoustic suspension system.
I used a hair dryer and a vacuum to pop out the pushed in "fried egg" tweeter. One will not pop out and I will have to work on it.
 I put everything together and hooked it up to my tube amps. It sound really nice.


10/26/2013

Pioneer SX-434

Found at Goodwill last night. Pioneer SX-434 Stereo Receiver. She needed a little TLC. I installed 3 new lamps, and a new stereo indicator light. The old one was in it's correct bracket, but the previous, previous light base was also in there. I removed that and installed a new sub mini light, installed the bracket (after removing the mess of tape on it), and hot glued it in place. Cleaning the pots was a chore as I had to remove the base, and a circuit board to get to them. Then the knobs and faceplate were cleaned, and some furniture polish cleaned up the top.
 
  For a small 15 watt per channel stereo this one has a real wood cover. She sounds pretty decent.